An Introduction | Everyone can create
Everyone Can Create
This program aims to
- Introduces students to, or hones their skills to express themselves through Music, Photography, Video and Drawing.
- Support you as educators, with ways to bring these skills and techniques into every subject, at every level.
- Offers opportunities for you to compile your journal to complete your Apple Teacher accreditation
The workshop objectives aim to
- Explore the Everyone Can Create resources
- Enrich your creative skills with iPad in the context of teaching and learning
- Establish a plan for integrating creativity into your curriculum using the Everyone Can Create Guides
“Everyone should have the opportunity to learn skills across different creative mediums to become the next generation of innovators, artists, and creators.”
Throughout the activities, you are encouraged to consider how technology can play a major role in bringing creativity, creative expression and empower users to apply personalisation to support their learning and growth.
In 2018 the World Economic Forum released a report called ‘The Future of Jobs’
This highlighted the most important and in-demand skills for employees in the future, with Creativity high on that list.
Why does it matter?
In 2019 Gallup published the Creativity in Learning review: there was strong evidence of students developing critical thinking, problem solving skills and connecting learning to the real world, through transformative use of technology.
The report also found that Teachers’ use of education technology is strongly related to support from school leaders and parents — when TEACHERS feel free to be creative, students see the creative process modelled, and they are more likely to embrace challenges that require creativity of their own.
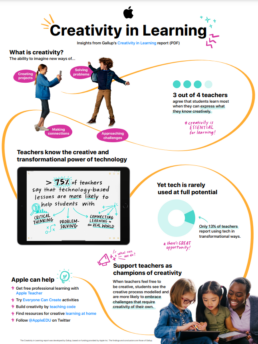
There was strong evidence of students developing critical thinking, problem solving skills and connecting learning to the real world, through transformative use of technology.
The report also found that Teachers’ use of education technology is strongly related to support from school leaders and parents — when TEACHERS feel free to be creative, students see the creative process modelled, and they are more likely to embrace challenges that require creativity of their own.
The Creative Process
Working through to form ideas, to make, to communicate
Engagement
Encouraging engagement: to deepen the learning and better the outcomes
The Arts
Allowing teachers and schools to bring the arts in to learning across the full curriculum.
Which leads to a questions: “What is creativity?”
Before continuing with the next modules, take a moment to reflect on
- What “Creativity” means to you.
- What does it look like in your classroom?
- How does your thinking match or contrast with your colleagues in school?
Every One Can Create Music
Recording audio has incredible power to enable pupil voice and individual expression.
We no doubt all have some experience of how music, a simple melody, can evoke memories and transport us back to a moment in time…. We can be deeply moved by a story told straight from a songwriter’s heart, or lifted by a beat.
Music is a language of hman expression. Every culture has its own form of music, enjoyed by all ages.
This Module will enable you to:
- Record your voice with the Audio Recorder and change your voice using effects
- Preview and select audio loops to enhance the mood of the story.
- Edit audio recordings to create polished interviews and stories.
You will need
- GarageBand available for iPhone & iPad.
You are also advised to have downloaded the following free ibooks available from Apple Book Store:
- Everyone Can Create Music on iPad
- Everyone Can Create Teacher Guide
- Everyone Can Create Teacher Guide – Early Years
NB: If you are using a school device managed by an Mobile Device Management (MDM) solution, each book and app will need to be purchased (no charge) and deployed through the MDM service. Your MDM administrator will need to know how many licences are required for each and which devices (or users, if set up as shared devices) you want to give access to.

We’re starting with the basics of voice to gain the confidence and skills you need to tell your own story through a podcast or song as we explore Garage band on the iPad.
Even if you’ve never taken a music lesson, we’ve all played an instrument – our voice.
You can make it go louder, softer or lower… changing the way it sounds.
In garage band, you can record your voice, add sound effects, music and more to create a podcast, build a news report, record an interview for a class project and share your story with a wider audience…
Not only can you explore the options of volumes, pitch and speed when you record your voice, listening back to your voice can help you to
- improve the way you tell a story,
- review how you present information,
- consider how it sounds to others.
Activity 1
Recording a podcast
Chapter 1, Pages 6 – 11
From the Everyone can Create Music on iPad book
Following the instructions from the book:
- Open GarageBand and select + to create a new project
- Navigate to and select the Audio recorder.
- You are advised to select the Fun tab rather than the Studio tab. This allows retrospective changes to to the settings , so just pick one and see how you can still review and adjust your recording afterwards..
- Be aware of where the mic is on the ipad and sure that this is pointing toward the sound you want to record, making sure it isn’t being covered by your fingers or any stand or pop you may be using.
- Turn off the metronome – this will tick to count you in, but it you’ve left it on for your recording, it can’t be removed and you’ll need to re-record.
- Wait for the countdown and then take a short pause – it is often easier to trim away excessive silence than it is to start over.
- Playback your recording to review it. Having selected the Fun tab, you can now select any of the other options to hear how they change your recording. Select the one of your choosing before moving on to activity 2.
Activity 2
Using Loops to enhance your story.
Chapter 1, Pages 12 – 15
From the Everyone can Create Music on iPad book
Loops are pre-recorded audio snippets that you can use to add drumbeats, music or sound effects to a project.
They’re called loops because you can usually make them “loop” to repeat for as long as you want them to in your recording.
You can choose from thousands of Apple Loops in Garage band to build atmosphere, drama and fun into your recorded podcasts, stories and music.
Following the instructions from the book:
- Select the icon that looks like a brick wall (top left of screen). You are now in the Studio view and will see your recording as a track in your project.
- Select the Loop icon (top right of screen)
- Tap in Search Apple Loops or use the Filter by option if you know which loop package to look for. Note the option to look for more Apple Loops – here you can download additional packs from the Sound Library with an option to preview first.
- Select some different loop options and preview them. You can select to play your voice track and preview different loops so you can hear them together.
- You will likely notice how the loop can make it hard to hear your voice recording. Use the volume slider at the bottom of the Loop browser to adjust the audio.
- Select a loop and add it to your project.
- Drag the loop to an empty part of the Tracks view screen. Garageband automatically creates a new track in your project and adds the loop to it.
- Drag the loop to align its left edge with the section of your recording where you want it to start playing – if you want it to start at the very begining, drag it all the way to the left.
- Tap the loop to select it. then tap Loop in the menu and it will automatically loop to repeat for the duration of your project.
- Review your entire project and tap stop when you have finished
- Tap the My Songs icon to exit an save your project.
Through the power of Apple Music, you have unprecedented access and use of professional Loops in GarageBand from popular artists.
Activity 3
Edit an interview
Chapter 1, Pages 16 – 20
From the Everyone can Create Music on iPad book
Interviews are a great way to gather and share information. When you record an interview in GarageBand, the voices of both interviewer and interviewee are recorded onto a single track.
If one is louder than the other, which is often the case, you can split the recording and put each on it’s own track to balance the volume.
In this activity you will learn audio editing techniques for splitting recordings and making adjustments to give your projects a polished and professional sound.
Following the instructions from the book:
- Download and open the project files for this actifvity – these are linked to on page 16 of the book, but you can also access these from the Materials section at the top of this module.
- If you can’t access the files through either route, you can always record two sound tracks of your own to work with for this activity.
- Split the region: Each chunk of recorded audio that you add to a project is shown on the timeline as a coloured rectangle called a region. You can split, move and trim regions to edit recordings.
- Reviwing the recordings, select a section of the region to split the recording, draging the scissors down to separate the region into two separate regions.
- Add a new track: You can now put each voice recording on its own track.
- Tap the microphone on track 1, then tap it again to duplicate.
- Touch and drag the second region on track 1, down on to track 2.
- Trim the silence: Sometimes, interviews include long pauses between questions and answers – this is an advised way of recording them, allowing for easier editing if sections need to be cut out or added in…. but you will need to remove the dead space to make your finished piece easier to listen to. Trim the regions to remove these stretches of silence.
- Adjust the volume of each track: Now that the voices from the interview are on separate tracks, you can adjust the volume of each one separately.
- Drag the handle to the right to show the mixer controls for each track, including th Mute button, a Solo button and a Volumen slider.
- Use the volume sliders to balance the volume of both voices.
- Tap the My Songs icon to save and close your project.
- Export and share your project:
- From the My Songs broswer, touch and hold a project, then tap Share.
- Tap Song.
- Select High Quality, then tap Share.
- Chose the method you want to use for sending your song.
Note that for Copyright reasons, Songs can only be exported if they contain the recording of a Touch Instrument or a Live Loop.
Why does it matter?
As with the activities we completed before with the Camera and Photos App, these might be simple, fun task… but the aim is to allow the time to explore and make mistakes, guiding our children through the tools available, critiquing their choices and giving them the skills to confidently make choices which they can then use in purposeful situations.
Select each of the headings below to read more:
Reflect on your own activities here and think about how you might use this in the classroom. Consider the discussions and statements shared during the Every One Can Create sessions and in particular
- The benefits of Creativity for learners
- What Creativity might look like in the classroom / for your learners
Apple believes that
- Recording vocal tracks creates a risk-free environment for students to practice audience awareness and to communicate ideas better through inflection and tone.
- Adding Live Loops makes it easy for students to create original recordings by arranging clips.
Classroom Task
Plan, record and edit a short podcast.
Use Chapter 1, Page 21
From the Everyone can Create Music on iPad book
The classroom task is for you to complete with your pupils.
Selct each of the options to consider how you might approach this task:
As appropriate for the children you are working with, you may decide to share the ibook with them before embarking on this project, covering the activities you have completed here to prepare them for the this task.
Bear in mind that you will need to have obtained the licences for the Everyone Can Create iBook and deployed them to the pupil iPads first.
- Do you know who manages this in your school?
- It may be some one in school or a third party technical service.
See this Module’s Materials section to access a Design Workbook
Is this an individual or collaborative challenge?
However you challenge your children, don’t miss out on the planning stage, setting key objectives with them to help them map out the needs.
Are they to Interview a teacher, visitor, class mate or family member?
Plan out the questions that are to be asked – pupils could
- share the questions ahead of the “interview” to allow the interviewee to prepare their answers
- record their questions, with pauses in between, before asking the interviewee.
Also consider whether the main objective here is for the children to explore the possibilities, or do you require a specific outcome?
See this Module’s Materials section to access a Design Workbook
Reviewing of our plans, available resources, time and outcomes aswell as acting on feedback from others, are critical skills in life.
In the same way that this course encourages you to reflect on your activities, this activity offers opportunities to encourage your pupils to do the same and to consider
- What went well?
- What might have worked better?
- What changes might they make next time?
Can you make time available for peer to peer review?
Update your journal
This not only gives you a chance to plan, reflect and review, your notes can also be uploaded to build your Apple Teacher Portfolio so that you can gain your Apple Teacher Accreditation.
See the Module Materials section if you haven’t already accessed the Participant Workbook or the Apple Teacher Portfolio Template.
Every One Can Create Photos
Photos are a fun, powerful way to express ideas visually and illustrate learned concepts.
The photo guide teaches pupils photography fundamentals, using the Photos and Camera apps to practice storytelling techniques – by capturing things, scenes, people, and moments. They’ll learn to consider angles, balance, and symmetry to tell stories through still shots.
This Module will enable you to:
- take considered photographs of objects in a variety of lighting conditions and at different angles
- consider placement, and distractions
- adjust focus and exposure
- practise using the editing tools in the photos app to optimise your photos and to bring them to life with annotations.
You will need
- Apple Camera and Photos Apps available for iPhone & iPad.
You are also advised to have downloaded the following free ibooks available from Apple Book Store:
- Everyone Can Create Photos on iPad
- Everyone Can Create Teacher Guide
- Everyone Can Create Teacher Guide – Early Years
NB: If you are using a school device managed by an Mobile Device Management (MDM) solution, each book and app will need to be purchased (no charge) and deployed through the MDM service. Your MDM administrator will need to know how many licences are required for each and which devices (or users, if set up as shared devices) you want to give access to.



The focus here is to start thinking like a Photographer and to experiment…
Activity 1
Everyday objects
Chapter 1, Pages 6 – 9
From the Everyone can Create Photos on iPad book
Think of everyday photos, and explore their characteristics to tell stories.
Have a look around you and find a simple inanimate object….
- Take a close look at it, turn it around, look at it from different angles….
- Pose it – chose somewhere you can sit it without too much background distraction or with a a diverse background
- What about the lighting – things can look very different when photographed in alternate lighting conditions or from a variety of angles.
- Move into different positions to frame your image and explore how changes in light and perspective impact your photo
- Zoom in and out.
Open your picture in photos and select Edit.
Here you find the editing tools. Explore the options to make quick enhancements to your photograph with
- crop, straighten and flip,
- apply enhancements and increase exposure
Next, your challenge is to give this everyday object, a character – perhaps a character that could be used in a story or around your classroom to highlight some key messages.
- Select the ellipses at the top right of your screen in edit mode
- Tap Markup: What characteristics can you add on?
It doesn’t matter how you rate your drawing capabilities, this is a chance to explore your creative inner-being to bring this everyday object to life – perhaps add some ears, eyes, mouth. hair for a simple edit.
At any point, you can select to revert your image, removing all of your changes and taking it back to it’s original state, so this truly is a time for free expression.
Activity 2
Take a photo walk
Chapter 1, Pages 10 – 11
From the Everyone can Create Photos on iPad book
Think of a theme and take a walk taking photos of objects that have something in common. This might be
- Colours: Vivid, clashing, or muted tones or your favourite colour
- Shapes: Triangles, circles, squares or stars
- Lines: Parallel, wavy, converging
- Textures: Weathered, reflective, rough, soft, peeling
- Patterns: Repeating lines, shapes, textures or colours
- Materials: Man-made or natural.
Buikd albums of your photos:
- Create a New Album, giving it a descriptive word appropriate for the photos you have taken; eg Red, Circles, Rusty Things… Tap Save
- Tap to select all the photos you want to add to the album – a blue tick will appear to show which have been selected.
- Tap Done. You will see your new Album uner My Albums.
- Create other Albums for other collections, sorting by different categories – photos can be in more that one Album.
- Lines: Parallel, wavy, converging
- Textures: Weathered, reflective, rough, soft, peeling
- Patterns: Repeating lines, shapes, textures or colours
- Materials: Man-made or natural.
Why does it matter?
While these might be simple, fun task… the aim here is
- to allow the time to explore and make mistakes,
- to guide our learners through the tools available,
critiquing their choices and
giving them the skills to confidently make choices
Think about how you might use this in the classroom, bearing in mind the discussions and statements shared during the Every One Can Create sessions about
- The benefits Creativity for learners
- What Creativity might look like in the classroom / for your learners
Apple believes that
- Taking photos of everyday objects helps students develop observational skills and find beauty in details around them.
- Personifying everyday objects offers students the opportunity to see things differently and think about ways they can use photography to tell creative stories.
- Building a collection of themed images helps students develop classification and categorisation skills.
Classroom Task
Create a collage composition
Use Chapter 5, Pages 37 – 40
From the Everyone can Create Photos on iPad book
The classroom task is for you to this resource with your class.
Selct each of the options to consider how you might approach this task:
Where and when is this task to be undertaken?
- Are their sufficient opportunities for the children to achieve an outcome?
or
- Is the purpose of this activity to learn the principles, be introduced to the concept and explore the opportunities?
This task suggests that task the children with pictoraialising their name.
- Bear in mind that there may be limitations to find the letters that the children in your class need to complete their name – certainly for those with longer names vs those of us with simple names.
- You may want to think about tasking them to create some specific words or collate other images instead, relative to other areas of the curriculum that you’re working on.
- Does this work better as a collaborative project, where all can contribute to the outcome?
At each stage of this course, you are encouraged to review how each activity went for you…
Encourage your class to consider how this activity worked. How did they feel about the challenge or having the opportunities presented?
There is much value from experimenting and making mistakes if we allow ourselves to consider how we might make improvements.
Update your journal
- This not only gives you a chance to plan, reflect and review, your notes can also be uploaded to build your Apple Teacher Portfolio so that you can gain your Apple Teacher Accreditation.See the Module Materials section if you haven’t already accessed the Participant Workbook or the Apple Teacher Portfolio Template.
Every One Can Create Video
Video is an excellent way to help pupils create their own stories and to share their understanding
A great way to tell stories. Documenting and sharing learning, stories helps learners construct meaning from their experiences. Apps like Camera, Clips and iMovie, all help learners to produce imaginitive, narrative and inspiring videos that document all types of learning experiences…
This Module will enable you to:
- Trim and arrange clips
- Add a musical soundtrack to enhance the mood
- Use filters, titles, stickers and other effects to tell a visual story.
You will need
- Apple Clips App available for iPhone & iPad.
You are also advised to have downloaded the following free ibooks available from Apple Book Store:
- Everyone Can Create Video on iPad
- Everyone Can Create Teacher Guide
- Everyone Can Create Teacher Guide – Early Years
NB: If you are using a school device managed by an Mobile Device Management (MDM) solution, each book and app will need to be purchased (no charge) and deployed through the MDM service. Your MDM administrator will need to know how many licences are required for each and which devices (or users, if set up as shared devices) you want to give access to.


The focus here is to start thinking like a movie maker…
Companies assign big budgets to ensure their designers are delivering memorable videos for their brand.
Adverts often just 2 minutes long, provide a great opportunity to review “what makes a great video?”
Activity 1
Record and edit
Chapter 1, Pages 7 – 11
From the Everyone can Create Video on iPad book
The key thing in making a great video is to think visually… and we have some progression opportunities here, from the hints and tips learned using the Camera for the photo sessions: composing a shot… considering lighting/perspective and backgrounds, removing or using distractions for good benefit and allowing our learners to make mistakes, reviewing them, trying again…
The video clip below demonstrates the steps to start creating your own introductory video using the Clips app.
Activity 2
Build a montage
Chapter 1, Pages 12 – 16
From the Everyone can Create Video on iPad book
This second video clip guides you through the next steps for your montage.
Activity 3
Add a storyline
Chapter 1, Pages 17 – 24
From the Everyone can Create Video on iPad book
The video clip below shows the steps to add audio to create the storyline.
Why does it matter?
Select each of the headings below to read more:
Think about how you might use this in the classroom, bearing in mind the discussions and statements shared during the Every One Can Create sessions about
- The benefits of Creativity for learners
- What Creativity might look like in the classroom / for your learners
Apple believes that
- Learning the skills of recording and editing video Clips gives pupils the foundations to visual communications
- Using the graphic features in Clips teaches pupils how to expressively emphasise content and visual elements.t way to tell stories. Documenting and sharing learning, stories helps learners construct meaning from their experiences. Apps like Camera, Clips and iMovie, all help learners to produce imaginitive, narrative and inspiring videos that document all types of learning experiences…
Classroom Task
Create a Tutorial Video with Clips
Use Chapter 4, Pages 57 – 74
From the Everyone can Create Video on iPad book
The classroom task is for you to complete with your pupils.
Selct each of the options to consider how you might approach this task:
As appropriate for the children you are working with, you may decide to share the ibook with them before embarking on this project.
Bear in mind that you will need to have obtained the licences for the Everyone Can Create iBook and deployed them to the pupil iPads first.
- Do you know who manages this in your school?
- It may be some one in school or a third party technical service.
Chapter 3 covers Storyboarding
This is a great activity to plan ahead. This could be collaboratively or individually.
Whether the children are using pens and paper or any of ht digital tools available to them such as Whiteboard, Word, OneNote, PowerPoint, Pages, Keynote, Notes, Google Docs or Slides, the aim of this task to capture the ideas, plan the sequence and to enable everyone to make a judgement as to what the right tool for the task at hand rather than using technology for the sake of it.
Reviewing their storyboards, or reviewing other examples of work?
Depending on the time you can make available, consider making opportunities for your children to
- Critic some examples of tutorials,
- Be a critical friend
Note the Queen’s Jubilee video shared below which offers an excellent example to review what makes a good movie – all jam (or marmalade) packed into just a short clip.
So whether you’re using Clips or iMovie….
Encourage your pupils to plan their content and to consider what makes a clip that is worth watching, whether it’s informative, instructional, sharing a point of view or to entertain…
For the Queen’s Platinum Jubilee, we were offered an excellent resource for considering how different shots, camera angles, cuts and soundtracks can be used to good effect. It packs a punch in just 2mins 28secs!
Apart from an awe inspiring setting you will no doubt have noted:
- Establishing shots: setting the scene, holding interest, focus points
- Clear, paced speech.
- Short recordings edited together, close, medium and long shots
- Combination of sound effects, speech and soundtrack to pull the story together
Update your journal
This not only gives you a chance to plan, reflect and review, your notes can also be uploaded to build your Apple Teacher Portfolio so that you can gain your Apple Teacher Accreditation.
See the Module Materials section if you haven’t already accessed the Participant Workbook or the Apple Teacher Portfolio Template.
